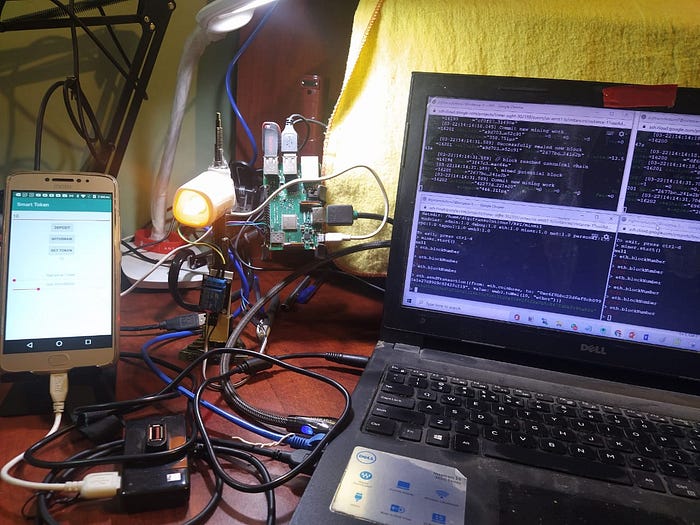
Smart Home Solution using Android and Blockchain

Smart home solutions can control the house hold electrical and electronics equipments such as light, fan, doors, lockers, water pumping motor, TV, refridgerator etc. Android app can be used to control these equipments through Blockchain and smart contracts. Android app connects with Ethereum nodes through JSON-RPC and Web3j. Raspberry Pi is employed as an ethereum node along with two more GCP VM based miner nodes. All 3 nodes run Blockchain and form a P2P network. The Raspberry Pi node controls a light to switch on and off. A smart contract is deployed on Blockchain through Web3.0 and controls the light by transactions such as depositing the tokens and withdrawing the tokens. This mini-project involves technologies such as Blockchain, Android, IOT, Cloud computing and Web3.0.
The following development environments are required:
1. Google cloud VMs (2nos) for running miners (Geth)
2. Raspberry PI as a Blockchain node (Geth)
3. Truflle Environment to build and deploy Smart Contract (Solidity)
4. Android Studio to build Android application with Web3J (Java/Kotlin)
5. IOT client application running on RPI (JavaScript/NodeJS)

Pre-requisite
1. Make sure Part1 of this article is executed:
https://anbunathanramaiah.medium.com/smart-home-solution-using-smart-contract-7eb7cd3407d3
2. Assign static IP to RPI
192.168.0.1
admin
admin
DHCP->Address Reservation
Add new -> mac address = b8:27:eb:13:29:78, ip = 192.168.0.200
save
system tools -> reboot
3. Configure GCP Firewall:
name = allow-rpc
Direction=Ingress
Action on match=Allow
Target tags = rpc
Source IP ranges = 0.0.0.0/0
Protocols and ports = Specified protocols and ports
tcp:8042,8043
Save
Add target tag:
Add Target tags in both instances 35.247.47.68 and 34.105.65.4
compute engine -> VM instances -> instance-1 -> Network tags -> Add rpc -> Save
compute engine -> VM instances -> instance-2 -> Network tags -> Add rpc -> Save
Re-start both VMs
Steps to build an IOT application
1. Start miners
cd /home/digitransolutions7/RPI
First, start both miners (miner #1 and miner #2).
1.1 Start miner1 in vm1 (35.247.47.68)
Create startminer1.sh
— — — — — — — — — — -
#!/bin/bash
geth — identity “miner1” — networkid 42 — datadir “~/RPI/miner1” — nodiscover — mine — rpc — rpcaddr 0.0.0.0 — rpcport “8042” — port “30303” — allow-insecure-unlock — unlock 0 — password “~/RPI/password.sec” — ipcpath “~/.ethereum/geth.ipc” — rpcapi “db,eth,net,web3,personal,miner,admin,txpool,debug”
— — — — — — — — — — —
sh startminer1.sh
//from another cmd window with admin
geth attach “http://35.247.47.68:8042"
1.2 Start miner2 in vm2 (34.105.65.4)
cd /home/digitransolutions7/RPI
Create startminer2.sh
— — — — — — — — — — — -
#!/bin/bash
geth — identity “miner2” — networkid 42 — datadir “~/RPI/miner2” — nodiscover — mine — rpc — rpcaddr 0.0.0.0 — rpcport “8043” — port “30304” — allow-insecure-unlock — unlock 0 — password “~/RPI/password1.sec” — rpcapi “db,eth,net,web3,personal,miner,admin,txpool,debug”
— — — — — — — — — — -
sh startminer2.sh
//from another cmd window with admin
geth attach “http://34.105.65.4:8043"
- 3 start blockchain in RPI
Install Geth
https://geth.ethereum.org/downloads/
wget https://gethstore.blob.core.windows.net/builds/geth-linux-arm7-1.10.3-991384a7.tar.gz
tar zxvf geth-linux-arm7–1.10.3–991384a7.tar.gz
cd geth-linux-arm7–1.10.3–991384a7
sudo cp geth /usr/local/bin
geth version
cd /home/ubuntu/rpi-gcp
geth — identity “node1” — syncmode “fast” — networkid 42 — datadir “~/rpi-node/node” — nodiscover — rpc — rpcaddr 0.0.0.0 — rpcport “8042” — port “30303” — allow-insecure-unlock — unlock 0 — password “password.sec” — ipcpath “~/.ethereum/geth.ipc” — rpcapi “db,eth,net,web3,personal,miner,admin,txpool,debug”
To attach
open separate cmd window
geth attach “http://localhost:8042"
eth.coinbase
“0xe6f8bbc22d6ef8cb0991e1a27d9909c92422c119”
from miner1, send 10 ethers to RPI:
eth.sendTransaction({from: eth.coinbase, to: “0xe6f8bbc22d6ef8cb0991e1a27d9909c92422c119”, value: web3.toWei(10, “ether”)})
1.4 Synchronize RPI
Finish RPI configuration based on ‘rpi configuration.txt’
Update the file “static-nodes.json” with RPI enode
— — — — — — — —
[
“enode://f9d48547c373fd61124d110791168572382298979d18ab5d6314cd399538ef77b8ff826b870a3474ad351f175b6d4d6f03c09ab4382b4d075e6a3c7fdeee58aa@35.247.47.68:30303?discport=0”,
“enode://991f8279ae27e665151621a9940b42e208bb7cda0108c3cda219059bed28fbb7ec869b04db84d173fbb1cecdce5fef222d010f02a90238e7d8a53b163f6b0a2a@34.105.65.4:30304?discport=0”,
“enode://2bb141277704d6ca1e7920c744090e01f53c3842f238a09c9b14c425eb0eb75ef5bbf3b294d9d3dd37f9d321ffcac1314c46e49473f1f66a3f7ad828d116a364@192.168.0.200:30303?discport=0”
]
— — — — — — — — -
/copy static-nodes.json into the folders
in vm1,
/home/digitransolutions7/RPI/miner1
in vm2
/home/digitransolutions7/RPI/miner2
/home/ubuntu/rpi-gcp/node
//exit all 3 miners and again re-start miners
//from attached windows, check peer status
admin.peers
//Observe all 3 miners are paired.

2 Start mining
from both vm1 and vm2 cmd window attachments,
miner.start()
eth.mining > true
//in first attachment
web3.personal.listAccounts
web3.personal.unlockAccount(web3.personal.listAccounts[0],”blockchain”, 15000)
eth.getBalance(eth.coinbase)
eth.blockNumber
eth.coinbase
“0xfaec65d82c950b9f21e46c506c359a74eca5c9c9”
3 Get Private Key
3.1 Get private key for RPI (to control light)
In RPI,
sudo npm install -g keythereum
sudo npm install keythereum
data dir = /home/ubuntu/rpi-gcp/node
cd ~/
node
— — — — — — — — — — — —
var keythereum = require(“keythereum”);
var keyObject = keythereum.importFromFile(“0xe6f8bbc22d6ef8cb0991e1a27d9909c92422c119”, “/home/ubuntu/rpi-gcp/node”);
var privateKey = keythereum.recover(“blockchain”, keyObject);
console.log(privateKey.toString(‘hex’));
— — — — — — — — — — — — — -
Observe >
0x57fbf0ad60b682272423afa3c5bd9ed9c459cbf5af3c6f074594ba386ec37428
3.2 Get private key for miner1 (for test purpose):
npm install -g keythereum
data dir = /home/digitransolutions7/RPI/miner1
//cd /home/ubuntu/rpi-gcp
cd ~/
node
— — — — — — — — — — — —
var keythereum = require(“keythereum”);
var keyObject = keythereum.importFromFile(“0xfaec65d82c950b9f21e46c506c359a74eca5c9c9”, “/home/digitransolutions7/RPI/miner1”);
var privateKey = keythereum.recover(“blockchain”, keyObject);
console.log(privateKey.toString(‘hex’));
— — — — — — — — — — — — — -
Observe > 0x0938d8684c5f65dcf89a0c196d43e9e5f586ee75681d1b254de112a46998b9dd
4. Smart contract
4.1. Install truffle
open a new cmd window with admin
mkdir SmartToken
chmod -R 777 SmartToken
cd /home/digitransolutions7/SmartToken/
//https://registry.npmjs.org/truffle/-/truffle-5.1.66.tgz
sudo npm install -g truffle@4.1.16
//npm install solc@0.4.15
npm install solc@0.4.21
truffle init
truffle compile
4.2. Create smart contract
Copy the code from Github
https://github.com/anbunathan/blockchain_examples/tree/master/SmartTokenGCP
cd /home/digitransolutions7/SmartToken/contracts
In the “contracts” directory, create a file named “SmartToken.sol” and paste the following code:
— — — — — — — — — — — — — — — — — — — — — -
pragma solidity ^0.4.15;
contract SmartToken {
mapping(address => uint) tokens;
event OnValueChanged(address indexed _from, uint _value);
function depositToken(address recipient, uint value) public returns (bool success) {
tokens[recipient] += value;
emit OnValueChanged(recipient, tokens[recipient]);
return true;
}
function withdrawToken(address recipient, uint value) public returns (bool success) {
if (int(tokens[recipient] — value) < 0) {
tokens[recipient] = 0;
} else {
tokens[recipient] -= value;
}
emit OnValueChanged(recipient, tokens[recipient]);
return true;
}
function getTokens(address recipient) constant public returns (uint value) {
return tokens[recipient];
}
}
— — — — — — — — — — — — — — — — — — — — — -
4.3. Create deployment file
Replace the content of “migrations/2_deploy_contracts.js” with the following content in order to deploy our “SmartToken” Smart Contract:
— — — — — — — — — — — — — — — — — — — — — -
var SmartToken = artifacts.require(“./SmartToken.sol”);
module.exports = function(deployer) {
deployer.deploy(SmartToken);
};
— — — — — — — — — — — — — — — — — — — — — -
4.4. Update truffle.js
he file named “truffle.js” contains network settings used to identify your deployment platform.
— — — — — — — — — — — — — — — — — —
module.exports = { networks: { development: { host: “localhost”, port: 8042, network_id: “*”} } };
— — — — — — — — — — — — — — — — — —
4.5. Generate Smart Contract address and ABI (Application Binary Interface)
Make sure blockchain is running
Mining is started
eth.mining should return true
eth.blockNumber should return block number > 0, block number should keep incrementing
cd /home/digitransolutions7/SmartToken
truffle compile
//should compile successfully
truffle migrate — reset
truffle console
//Observe truffle(development)>
SmartToken.address
‘0x0ce678aa4dabef4627fd351deeb35889e6c3d246’
JSON.stringify(SmartToken.abi)
//ABI (Application Binary Interface)
— — — — — — — — — — — — — — —
[{“anonymous”:false,”inputs”:[{“indexed”:true,”name”:”_from”,”type”:”address”},{“indexed”:false,”name”:”_value”,”type”:”uint256"}],”name”:”OnValueChanged”,”type”:”event”},{“constant”:false,”inputs”:[{“name”:”recipient”,”type”:”address”},{“name”:”value”,”type”:”uint256"}],”name”:”depositToken”,”outputs”:[{“name”:”success”,”type”:”bool”}],”payable”:false,”stateMutability”:”nonpayable”,”type”:”function”},{“constant”:false,”inputs”:[{“name”:”recipient”,”type”:”address”},{“name”:”value”,”type”:”uint256"}],”name”:”withdrawToken”,”outputs”:[{“name”:”success”,”type”:”bool”}],”payable”:false,”stateMutability”:”nonpayable”,”type”:”function”},{“constant”:true,”inputs”:[{“name”:”recipient”,”type”:”address”}],”name”:”getTokens”,”outputs”:[{“name”:”value”,”type”:”uint256"}],”payable”:false,”stateMutability”:”view”,”type”:”function”}]
— — — — — — — — — — — — — — — -

5. Generate Java code which connects Android app with Ethereum through JSON-RPC and Web3j:
//Install solc and web3j:
sudo npm install -g solc@0.4.21
sudo wget –O https://github.com/web3j/web3j/releases/download/v4.0.1/web3j-4.0.1.tar
sudo chmod 777 web3j-4.0.1.tar
sudo tar -xvf web3j-4.0.1.tar
sudo mv /home/digitransolutions7/web3j-4.0.1 /home/digitransolutions7/web3j
sudo nano ~/.bashrc
export PATH=”/home/digitransolutions7/web3j/bin:$PATH”
source ~/.bashrc
web3j version
//observe 4.0.1
mkdir code
cd code
sudo chmod -R 777 code
cd ~/SmartToken/contracts
sudo cp SmartToken.sol ~/code/SmartToken.sol
cd ~/code
solcjs SmartToken.sol — bin — abi — optimize -o .
//Generate java file
web3j solidity generate -b SmartToken_sol_SmartToken.bin -a SmartToken_sol_SmartToken.abi -o . -p com.noev.ethereumhelloworld
//Observe Java file — “SmartToken_sol_SmartToken.java” is generated under
“/com/noev/ethereumhelloworld/” folder tree.

6. Add Android code
Copy the code from Github
https://github.com/anbunathan/blockchain_examples/tree/master/Android-GCPVM-SmartToken
6.1 The generated Java class — SmartToken_sol_SmartToken.java is added under:
“/app/src/main/java/com/noev/ethereumhelloworld/” folder
This Java class includes the following Remote procedures:
depositToken
withdrawToken
getTokens
6.2 In MainActivity.kt, the following variables are updated:
Add smart contract address in Android code
const val geth_url = “http://35.247.47.68:8042"
const val CONTRACT_ADDRESS = “0x0ce678aa4dabef4627fd351deeb35889e6c3d246”
const val PRIVATE_KEY_GETH = “0x57fbf0ad60b682272423afa3c5bd9ed9c459cbf5af3c6f074594ba386ec37428”
val recipient = “0xe6f8bbc22d6ef8cb0991e1a27d9909c92422c119”
private val credentials = Credentials.create(PRIVATE_KEY_GETH)
infuraHttpService = HttpService(geth_url)
web3j = Web3j.build(infuraHttpService)
“Success initializing web3j/GCPVM”
7. Build Android application and install
Gas=1wei
limit>=73000
Change token = 10
click on ‘Deposit’
Observe “Successful…” message
Click on “Get Token”
Observe 10 is displayed
click on ‘Withdraw’
Observe “Successful…” message
Click on “Get Token”
Observe 0 is displayed
8. Create IOT application in RPI
Copy the code from Github:
https://github.com/anbunathan/blockchain_examples/blob/master/RPI/smart_token.js
Create the Client application
//create — “smart_token.js”
cd ~/RPI/SmartToken
sudo nano smart_token.js
//Add SmartToken.address and ABI
— — — — — — — — — — — — — — — — —
// Interaction with GPIO
var Gpio = require(‘onoff’).Gpio
// Interaction with Ethereum
var Web3 = require(‘web3’)
var web3 = new Web3()
// connect to the local node
web3.setProvider(new web3.providers.HttpProvider(‘http://localhost:8042'))
// The contract that we are going to interact with
var contractAddress = ‘0x0ce678aa4dabef4627fd351deeb35889e6c3d246’
// Define the ABI (Application Binary Interface)
var ABI = JSON.parse(‘[{“anonymous”:false,”inputs”:[{“indexed”:true,”name”:”_from”,”type”:”address”},{“indexed”:false,”name”:”_value”,”type”:”uint256"}],”name”:”OnValueChanged”,”type”:”event”},{“constant”:false,”inputs”:[{“name”:”recipient”,”type”:”address”},{“name”:”value”,”type”:”uint256"}],”name”:”depositToken”,”outputs”:[{“name”:”success”,”type”:”bool”}],”payable”:false,”stateMutability”:”nonpayable”,”type”:”function”},{“constant”:false,”inputs”:[{“name”:”recipient”,”type”:”address”},{“name”:”value”,”type”:”uint256"}],”name”:”withdrawToken”,”outputs”:[{“name”:”success”,”type”:”bool”}],”payable”:false,”stateMutability”:”nonpayable”,”type”:”function”},{“constant”:true,”inputs”:[{“name”:”recipient”,”type”:”address”}],”name”:”getTokens”,”outputs”:[{“name”:”value”,”type”:”uint256"}],”payable”:false,”stateMutability”:”view”,”type”:”function”}]’)
// contract object
var contract = web3.eth.contract(ABI).at(contractAddress)
// components connected to the RPi
var greenLed = new Gpio(14, ‘out’)
var redLed = new Gpio(15, ‘out’)
var button = new Gpio(18, ‘in’, ‘rising’)
// display initial state
showStatus()
// watch event on the button
button.watch(function (err, value) {
if (err) {
throw err
}
showStatus()
})
// wait for an event triggered on the Smart Contract
var onValueChanged = contract.OnValueChanged({_from: web3.eth.coinbase});
onValueChanged.watch(function(error, result) {
if (!error) {
showStatus()
}
})
// power the LED according the value of the token
function showStatus() {
web3.eth.defaultAccount = web3.eth.coinbase
//web3.personal.unlockAccount(web3.eth.accounts[1], ‘blockchain’)
//web3.eth.defaultAccount = web3.eth.accounts[0]
// retrieve the value of the token
var token = contract.getTokens(web3.eth.defaultAccount)
// display the LED according the value of the token
const led = new Gpio(17, ‘out’); // Export GPIO17 as an output
if (token > 1) {
// Green: you have enough token
redLed.writeSync(0)
greenLed.writeSync(1)
led.writeSync(1)
} else {
// Red: not enough token
greenLed.writeSync(0)
redLed.writeSync(1)
led.writeSync(0)
// Toggle the state of the LED connected to GPIO17 every 200ms
//const iv = setInterval(_ => led.writeSync(led.readSync() ^ 1), 200);
}
}
// release process
process.on(‘SIGINT’, function () {
greenLed.unexport()
redLed.unexport()
button.unexport()
})
— — — — — — — — — — — — — — — — —
9. Run the client application
cd ~/RPI/SmartToken
node smart_token.js
10. Run Android application
Gas=1wei
limit>=73000
Change token = 10
click on ‘Deposit’
Observe “Successful…” message
Observe light is switched on
click on ‘Withdraw’
Observe “Successful…” message
Observe light is switched off
11. Demo
The demo of this project is given in the link:
Source code:
https://github.com/anbunathan/blockchain_examples/tree/master/Android-GCPVM-SmartToken
https://github.com/anbunathan/blockchain_examples/tree/master/RPI-GCP
References
1.Communicating with an Ethereum Smart Contract via Android
2.How to sync an Ethereum node without making the mistakes I made
3.Nodeless Ethereum Smart Contracts Development with Infura
4.Ethereum Blockchain “Hello World” Smart Contract with JAVA
Contact Details
Email: anbunathan.r@gmail.com
Website: http://digitranssolution.com